A/B testing is getting more and more popular, but typically in order to do so you had to add plugins to your site or use third party services. Now with Google Experiments, Google has integrated A/B testing right into their Analytics platform. What that means is you can easily test variations of your pages and have let Google use the data from your website to determine the winner.
What is Google Experiments?
Google Experiments is a simple way to test variations of your webpages to see which perform better.
Here’s an example: you want to know if a green button or an orange one will work better.
To test this out with an experiment, you will have two versions of your webpage. The first version will have your current green button (this is normally the page you already have). For the second version, you make a copy of your page and change the button to orange.
Then you head over to Google Experiments, tell it to run an experiment comparing the two pages and seeing which page gets more visitors to go to your contact page. Going to your contact page has a unique URL, so Google can measure it.
Your goal has to be measurable by a computer. So going to a specific URL is measurable, people being happier isn’t.
Before we get started, let’s cover what you need:
- Google Analytics script installed on your website
- A measurable goal
- Backup of your current theme files
- Ability to edit PHP files and undo those edits if needed
- A webpage you want to test variations of and at least one variation created
This tutorial is going to get technical and require to edit PHP files and add code snippets. If you don’t know how to do this, or are worried about crashing your whole site, hire someone to do it.
Page You Are A/B Testing
Before we head over to Google Analytics, you need to have a page to test. So, I’m going to call the page I want to test http://example.com/contact and I’m going to say I have a variation of this page that I want to test with http://example.com/contact-2.
Note: Before we go too far, if your original page and your variation page have very similar content then you should be using rel=canonical. What that means is on your variation page you should include
<link rel="canonical" href="http://example.com/contact/">(except use the URL of your original page). This helps to protect your SEO. If you want a long detailed description of why you can read Yoast’s article on rel=canonical.
The page I want to test is the “original page”, and the other is “variation 1”. Google Experiments lets you have several variations if you want to.
Great, we have pages to test, but before we get to testing, we need to setup our WordPress site to accept the code Google Experiments will give us and to put it in the correct location.
Setting Up Your WordPress for Google Experiments Code
The first step is to go over to your theme files and edit the header.php file. At the beginning of it, just after the <head> tag you need to add the following code:
<?php echo get_post_meta( get_the_ID(), 'google_experiments_code',true); ?>
Here’s an example of what it looks like:

Note that in the above code before what I inserted is <head>. Some themes may have code such as echo '<head>'; — if this is the case, you are already in a <?php ?> section, and you need to omit those tags. If you are unsure, get help. An error in your header.php file can make the whole front end of your website not render.
Now that you’ve done that, go to the page on your website which is your “original page” (following my example it was http://example.com/contact) and edit it.
In the upper right of your edit page (or post if you are testing a blog post) you’ll see “Screen Options”. Click on that.

Now make sure that “Custom Fields” is checked.
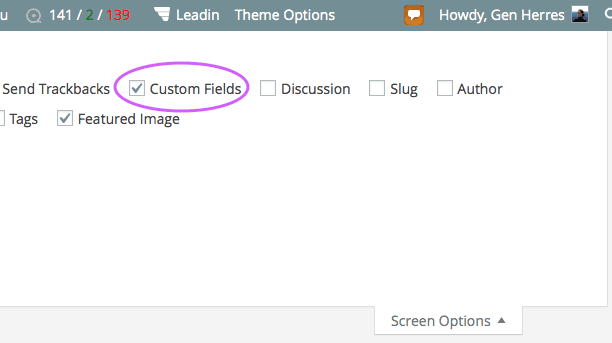
Now scroll down your page and look for the “Custom Fields” section. You need to find where it says “Add New Custom Field”.
Click on “Enter new”.


Note: If you are using the Advanced Custom Fields plugin, you can set this field up to be available on pages. Just set the field to Text Area and make sure that it doesn’t apply any formatting.
Setup the Experiment in Google Analytics
Go to Google Analytics and make sure you are signed in with the correct account. Click on the property you want to add the experiment to.

Go to Behavior and then Experiments and click on “Create experiment”.
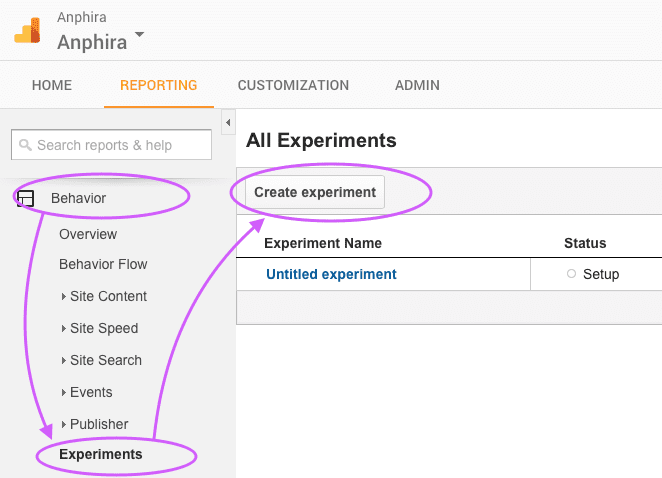
Name your experiment and select an objective. The defaults are bounces, page views, and session duration. But you can also set other objectives such as if the visitor makes it to a certain page or completes a form.
If you choose to set up a different objective, you’ll be taken to Goals where you can configure it. After you Goal is configured, you’ll need to head back to Reporting and then Experiments to complete the experiment you were working on.
Next you’ll decide how much traffic you want to experiment with (generally you want to experiment with 100% of your traffic). And then finally you’ll decide if you want to get email notifications.
Then you’ll click on Next and go to Step 2: Configure your experiment.
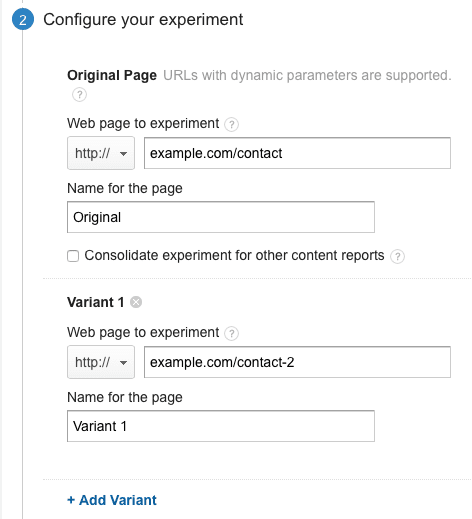
Here you’ll see that I inputed my “original page” url into the section designated for it. And my variation url into the section designated for Variant 1. You can add several more variants if you want to.
Each variant is a complete webpage, so it will have a full URL. Your original page and all variants have to be on the same domain.
Your variations can be only changing the color of a button, or they can be completely different looking pages. It’s your experiment, so you get to decide what you want to test.
Click on Next to go to Step 3: Setting up your experiment code.
In step 3 click on “Manually insert the code”.
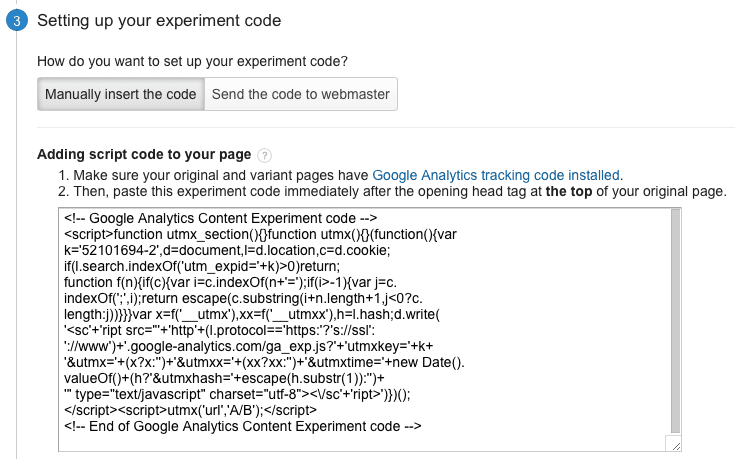
This is code that you add to your custom field you already setup on your original page.

Then just click on “Add Custom Field” and of course Update your page to save it in WordPress.
Now, back to your Google Analytics Experiment, click Next to validate you correctly entered the code.
If you’ve set up everything right, you’ll see check marks on everything like in the example below.
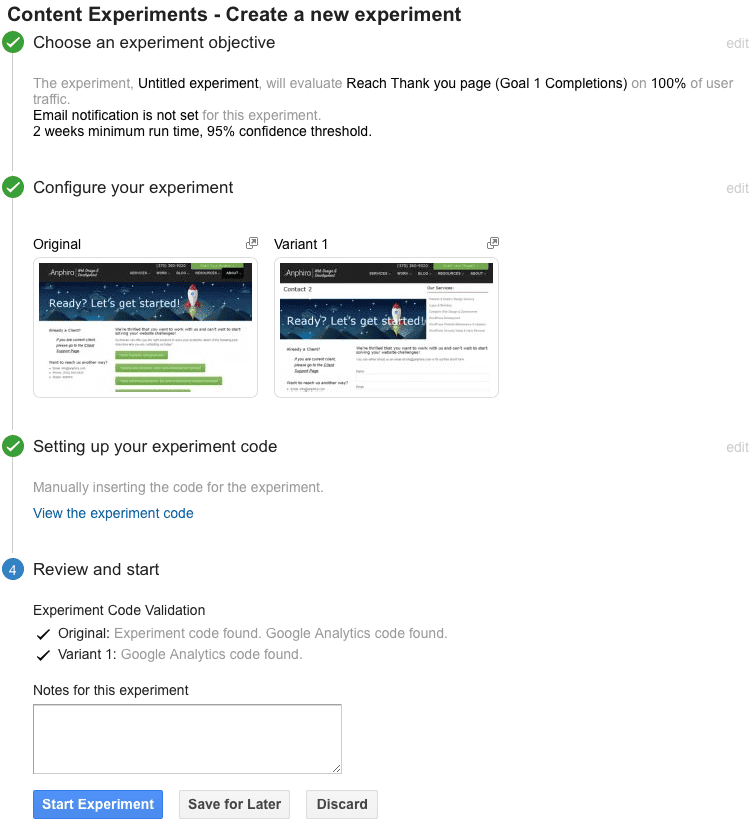
Here you can see that I’ve set up an object to reach a thank you page and I’m sending all of my traffic to the experiment. The experiment will evenly divide the traffic between the variations.
You can see that I have two pages and they look different.
And you can see that it verified the code was inserted correctly.
Now all I have to do is click on “Start Experiment” and let the experiment start. Google will start having data on the experiment in 24-48 hours, so wait a couple of days before you check on it.
Conclusion
The first time you set up a Google Experiment can be a little daunting and time consuming. Just pace yourself. Once you’ve done it a couple of times it gets much easier and must faster. Plus, after you’ve modified your header.php file, you won’t need to do that step again. Now that I’ve implemented Experiments on several websites, it’s much faster and easier to setup.


Well written! This is a great tool to have since Search Engine Optimization only gets visitors to your site, but if they don’t convert it doesn’t matter how much traffic you get. That is why Conversion Optimization is so important.
Great stuff!!!