A client recently came to me with an issue: one of her friends had a hacked WordPress site, and GoDaddy (their hosting provider) had restored the files, but the site still wasn’t working.
Unfortunately this example is far too common — what many people forget is that hosting companies maintain their servers, not your website. Which means they can do a restore, but after that you are on your own.

Disclaimer: This post will cover what I did for this specific site. Each site is unique and this is just an example of one possibility. When in doubt, get professional help.
Step 1: Check the Site Status
Before even getting started, the first thing is to run the site through a checker to see if it is displaying obvious issues or has any penalties against it. I use Sucuri’s Site Scanner as a starting point. I ran the domain through it and it showed obvious evidence of hack, but fortunately no blacklists for the domain.
Blacklisted means you have been penalized and after you have cleaned out the hack, you will have to take steps to remove the blacklist penalty.
When the domain is displaying obvious evidence of hack or malware but is NOT on a blacklist, the best course of action is to take the site down until it can be fixed. A site that can’t be accessed won’t get a blacklist penalty. So that’s what I do, before I do anything else, I take the site down so no one can access it.
Step 2: Assess the file situation
Most of the time with hack cleanouts, there is junk everywhere.
So I came in expecting a mess. I was not disappointed.
First, GoDaddy had restored her site, to a separate area of her file system. So the main site currently up was not touched in the restoration. This is standard procedure for most hosting companies. When they “restore your files” they mean they load a backup to somewhere else in your files. It’s up to you to find out where they put it and take care of actually restoring what you need.
Once I found where they put the backup, I checked it and it was also hacked. In fact one of the tags left by a hacker was from 13 months ago.
It’s common with hacked sites to find that it was hacked multiple times. Many times people have been hacked and don’t even know it.
This meant she now had two hacked websites sitting on her server — the current version which was both hacked and demolished, and the restored older version which was just hacked.
At this point I deleted everything on her current install. I then installed clean brand new files for all of WordPress core, and put in a clean wp-config.php file after changing her database username & password.
Step 3: Clean or Replace wp-content Folder
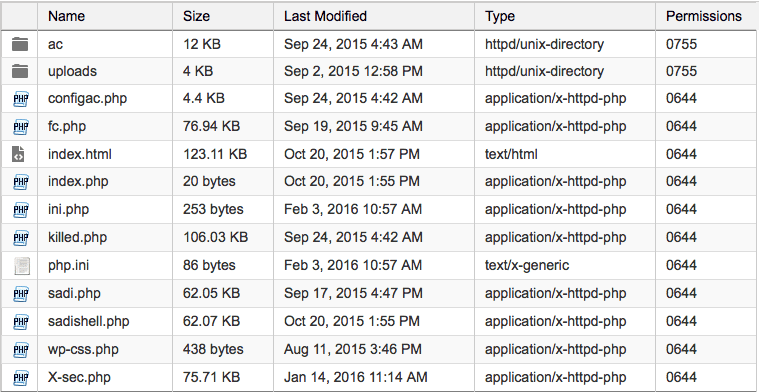
Everything in the /wp-content folder that can be replaced needs to be replaced. That means all standard themes and all plugins. However, in the current live site, the hackers demolished her existing /wp-content folder.
What the site looked like:

And this is what the folder is supposed to look like:

As you can see, this is completely demolished. So I deleted the existing /wp-content and replaced it with the /wp-content from the recovered. The recovered was still hacked and I still had to go through every folder and clean out quite a bit, but it at least had the important things like what themes and plugins were supposed to be there.
Replacing Plugins
First area I’m going to work on is the plugins. I’ll open up the backup of the database and look for the active_plugins entry in the _options table. This will tell me the plugins that are actually in use. I’ll delete every plugin currently present and check the index.php file in the plugins directory to make sure it is clean.
Next I’ll download clean copies of all of the in use plugins from the WordPress repository. Of course I’ll make sure that any plugins are actually current — for example on this site there was a plugin over 2 years old that replicates a current WordPress feature. So I did not download a copy of that plugin.
Replacing Themes
The next area is the themes folder. I will delete all themes not being used, any random stray php files, and verify that the index.php file is clean. Next I will check the template and stylesheet entries in the _options table of the database to find out which themes are actually being used. I will need to get clean copies of these themes from either the WordPress repository or from the appropriate theme developer.
In this case, the parent theme is Genesis which is from a premium theme developer and the child theme is Modern Blogger Pro, which is also from a premium theme developer. However, the child theme has been modified with some customization. Because of this, I’ll need to manually check all files in the child theme.
Fortunately this time, the child theme didn’t have any issues.
Cleaning Uploads Folder
For the uploads folder, there should not normally be PHP files. So, pretty much any .php or even .js file I find is from a hack. I’ll start with the year folders and make sure those only contain the file types they should.
One of the plugins on this site is a newsletter plugin and contains several templates. Unfortunately the majority of these templates look to have hacked code in them. What I’ll do is completely dump the folder and reinstall the plugin to get a clean folder.
Upgrade Folder
The purpose of the upgrade folder is for WordPress to use during upgrades. There should be no files in it on a normal basis. If there are any files here, delete them.
Step 4: The Database
Now that we’ve cleaned or replaced all of the files, it’s time to work on the database. Fortunately, the files are easier for hackers to target, so frequently the database is left alone.
Database checking can be a bit tricky, but one thing that you can check easily is to see what prefix all of the tables have. They should normally have the same prefix. And they should look like they belong to either the main WordPress core to a plugin.
Step 5: Visit the Site
Ok, now that things are cleaned up, it’s time to visit the site. Fortunately the site looks basically as expected.
Now to login. Since when I replaced all of the WordPress core files with new files, I had to run a database upgrade before I could even login.
Once I’m logged in I’ll check the permalinks — frequently after a major cleanup or upgrade permalinks need to be reset. It’s easy to reset these, just go to Settings > Permalinks and click on “Save Changes” TWICE. The setting you selected (frequently “Post name”) should already be selected, but you still need to save them TWICE.
The backend of the site looks good, so now it’s time to keep it that way!
Step 6: Backup & Secure the Site
One of the most important things to keeping a website secure is maintaining good backups. For backups I almost always use BackWPup, it’s free and easy to get up and running with. In fact I’ve written a whole tutorial (with video) on setting up BackWPup.
To secure the website I’ll use iThemes Security and Ninja Firewall. I’ve covered how I use these plugins in the appropriate tutorials. Click here to read the iThemes Security tutorial.
Step 7: Reduce Image Size and Optimize
Now that the site is cleaned, backed up and secured, it’s time to make sure it’s running smoothly. For this I use the Imsanity plugin to reduce the size of any overly large images and then WP Smush to add a little extra compression. For the database I run WP Optimize to clean out any junk that had accumulated (usually post revisions).
In this case running all of the optimization and compression brought the total backup size from 204MB down to 53MB. That’s a pretty significant change and a good example of what happens when sites aren’t regularly maintained.
Step 8: The Future
Step 7 is your ongoing maintenance for the future. At a minimum you should be checking your site every month.
Here is what I would consider the absolute minimum monthly maintenance:
- Keep regular backups and take a backup before any update
- Check Security Logs for potential issues
- Update plugins
- Update themes
- Update WordPress core
- Clean out your comment spam
If you want more details on what I would recommend for regular maintenance on your site, take a look at our maintenance plans.
All this Sound Daunting?
If your website is currently clean and unhacked, take a look at our maintenance plans. If you have been hacked, we clean out and secure WordPress websites regularly, take a look at our hack removal service or contact us.
