iThemes Security is the new incarnation of Better WP Security and it has stellar improvements! In this article I’ll cover the main features of iThemes and provide a basic user guide for getting up and running. Since this is a basic guide I have simplified some explanations.
Update: If you are getting a lot of email notices about lockouts it means that iThemes is doing its job. However it might start getting annoying. If it does, you can disable email notifications by going to settings and looking under General for Email Lockout Notifications. Just uncheck the box and then click save.

Some Background
For years the hardest thing about recommending a security plugin was finding one that was easy to use. Most security plugins are just flat-out confusing. The plugin I’ve been recommending is Sucuri Free.
Sucuri has very few options, a very easy to use scanner, and quick 1-click buttons for basic security. These are all great for usability, but are pretty limited when it comes to full-fledged security. I’ve always needed to do a bit of setup with other plugins as well.
Better WP Security has long been a top WordPress security plugin, but it’s always been a challenge for beginners (and even those with some experience). iThemes has taken over development of the plugin and they gave the user interface a complete facelift!
The New iThemes Security
Features
- Simplicity: There is a straightforward checklist style dashboard which gives you a clear picture of your current setup.
- Obscure: You can completely turn off login to your site during specific times. You can also rename your admin user, remove user ID 1, change your table prefix, and even change your wp-content path.
- Protect: Hide the more vulnerable parts of your site and ban bots. Enforce strong passwords and limit login attempts.
- Detect Issues: Monitor your site & report changes which may cause issues.
- Backups: iThemes can make backups and send them to you via (although your email account may not like the size of attachments) and it integrates with BackupBuddy.
- Additional Benefits: Custom admin & login URLs, 404 error detection, updates jQuery version.
Installation
iThemes Security installs like most plugins. You can download it from the WordPress.org repository manually or install via the admin interface. If you don’t know how to install plugins, you should consider managed hosting or a maintenance plan.
Any time you install a plugin which make may major changes to your site, you must have a complete backup and know how to restore that backup should something go wrong. If you don’t know how to backup and restore, you should get professional help.
If you don’t have a backup system yet, I recommend checking out BackWPup. It’s what I use and recommend (and have used to move and restore sites). I’ve written a basic tutorial to get you started on using BackWPup.
Using iThemes Security
Now that you have installed iThemes Security, you can get started securing your site. If you have don’t have any security measures installed, then you are good to go (as long as you have your backup and are ready to revert if needed).
If you currently use one of the larger security plugins like Wordfence or Bullet Proof Security, you will want to deactivate it. The major security plugins access and modify the same areas of your WordPress. This means they may have disagreements if more than one is active.
I’ve been running Sucuri Free alongside iThemes and haven’t had any issues between them.
When you activate iThemes Security you’ll see a blue message telling you that your site is almost ready. Click on “Secure Your Site Now” button to get started.

The first time you arrive at your new Dashboard you’ll see a checklist with 4 steps.
- Back up your site: iThemes only detects Backup Buddy as a backup solution, so if you use any other solution iThemes will think you don’t have a backup. If you don’t already have a backup, clicking the make a backup button will create backup.
- Allow File Updates: One of the major things that security plugins do is alter your .htaccess files to prevent unauthorized access to certain parts of WordPress. You’ll need to click allow file updates if you want security.
- Secure Your Site: This will get you started with the default settings for iThemes Security. These are the safest for compatibility and if you are a novice user. I highly recommend you click on One-Click Secure.
- Help Us Improve: Many plugin developers would like to collect data about how their work is used. If you click on Yes then you give iThemes permission to use anonymous data from your site.
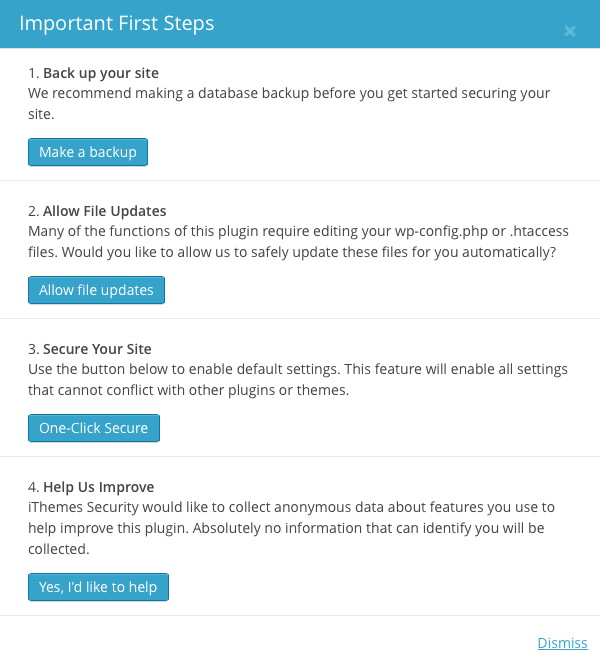
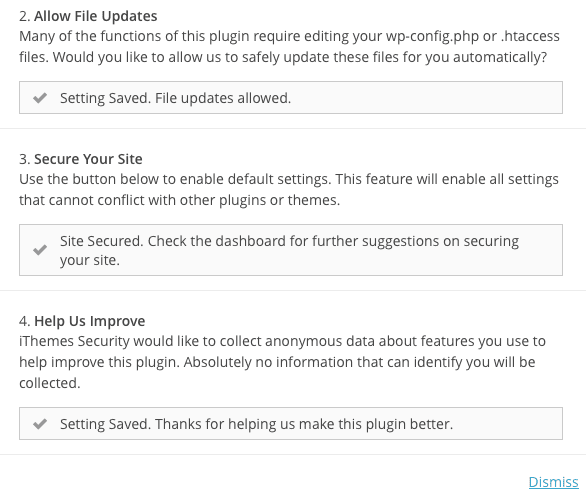
Once you’ve clicked on the options you want to use (I’ve used everything except backup since I have BackWPup running those) you can click on Dismiss in the lower right.
iThemes Security Dashboard
When you arrive at the dashboard (which you do after you click on Dismiss) you’ll see several different areas. The most important is the Security Status area.
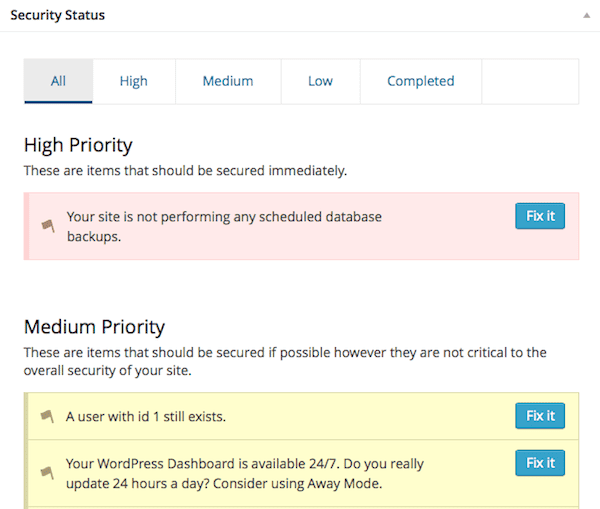
There are four sections to the Security Status area.
- High Priority: Tasks that are strongly recommended.
- Medium Priority: Tasks that are recommended.
- Low Priority: Tasks that are suggested.
- Completed: Tasks are already done.
Completed Security Measures
Using 1-click secure from the first steps has already set some security measures as complete. Also, I did not use all the default WP values when I set up my demo installation (for example no user named admin). I’ll run down all of my completed measures (these may not be completed on your site).
The admin user has been removed or renamed.
A number of brute force attacks against WordPress target the username “admin”. By not having this username, you aren’t a target of these attacks.
Your login area is protected from brute force attacks.
Brute force attacks attempt every possible password when they attack. By limiting the number of login attempts allowed, you make yourself a very frustrating target.
If you’ve been using a plugin like Limit Login Attempts, I would recommend deactivating that plugin. It serves the same purpose as this feature and you don’t want to the two plugins getting into a fight.
User’s nicknames are different from their display name.
Your login name and your display name should not be the same. That makes it too easy for attackers to guess a valid username.
Your site is protecting against bots looking for known vulnerabilities.
Use access restrictions to keep bots away.
Your WordPress installation is not telling every bot that you use WordPress.
Don’t advertise what platform you are using.
User profiles for users without content are not publicly available.
If a user doesn’t have content published (such as accounts which are only used for admin), they shouldn’t have a profile available.
Your database table prefix is not using wp_.
Since wp_ is the default table prefix, using something else makes it much harder for hackers to access your database information.
Your WordPress installation is not publishing the Windows Live Writer header.
Don’t publish any information that is not absolutely necessary.
Your login page is not giving out unnecessary information upon failed login.
When someone tries to login, don’t advertise all the details of their errors. For example, if you tell someone that the password was wrong but the username was correct, then hackers know what username to target.
High Priority
Since I did already have some measures installed, I only have one high priority item on the list.
Your site is not performing any scheduled database backups.
If you are using a backup solution other than BackupBuddy, this will be flagged. I am running BackWPup, so I will safely ignore this one.
Medium Priority
Medium priority security measures are recommended that you follow, unless of course you have a good reason not to.
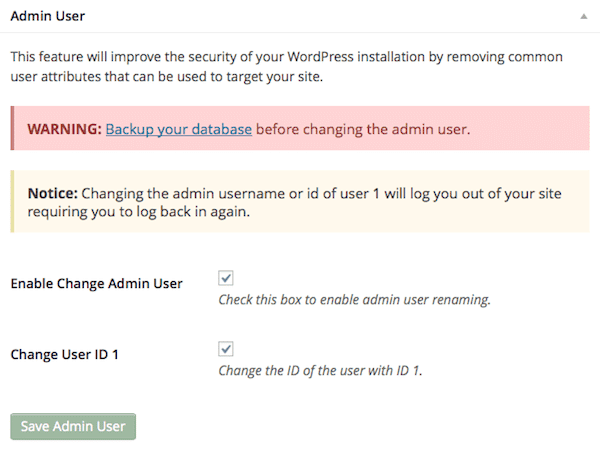
A user with id 1 still exists.
By default the first user you create with your WordPress installation will have id 1. This is the default id for attackers to try, so it is recommended to get not have any users with this id. Clicking the Fix it button will guide you on how to change it.
Your WordPress Dashboard is available 24/7. Do you really update 24 hours a day? Consider using Away Mode.
This option will lock out the admin area of WordPress during certain times. From the security standpoint completely locking out WordPress access means no one is getting in. From the web admin point of view not being able to access your site at all can be bad.
I would list this option under use with caution.
Your website is not looking for changed files. Consider turning on file change detections.
This notifies you if someone has gotten into your site and changed your files. The potential downside is that this feature is taxing on a web server, but there is an option to split the checking into multiple chunks.
I recommend using this option on lower quality web hosts (I also recommend avoiding low quality hosts). I’ve seen WordPress sites become infected because they were on a shared hosting account. Another site on the same server became infected and the infection propagated to every site on the shared server.
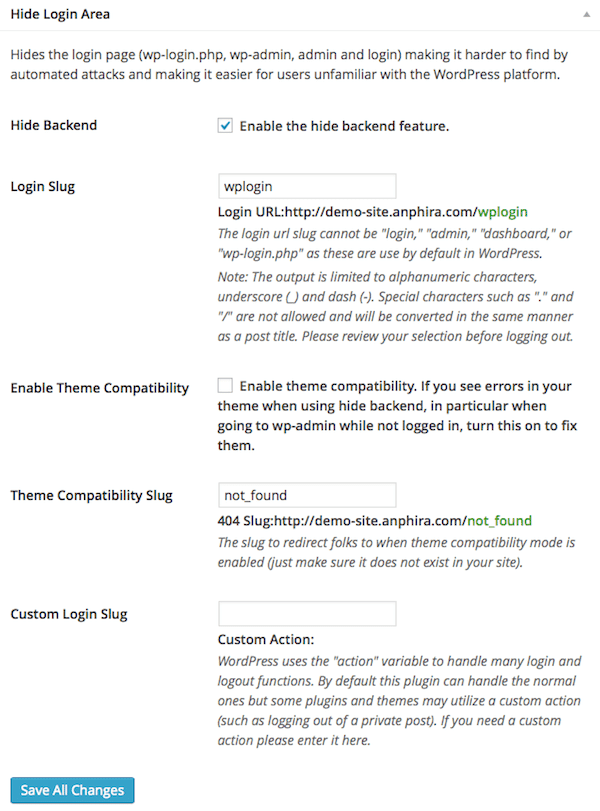
Your WordPress Dashboard is using the default addresses. This can make a brute force attack much easier.
Hiding your login area and backend at different URLs than the default is helpful in making your site harder to hack. However some themes and plugins have issues with this. There is a theme compatibility option to help with this.
You are not protecting common WordPress files from access. Click here to protect WordPress files.
Use file permissions to prevent public access to a number of WordPress system files.

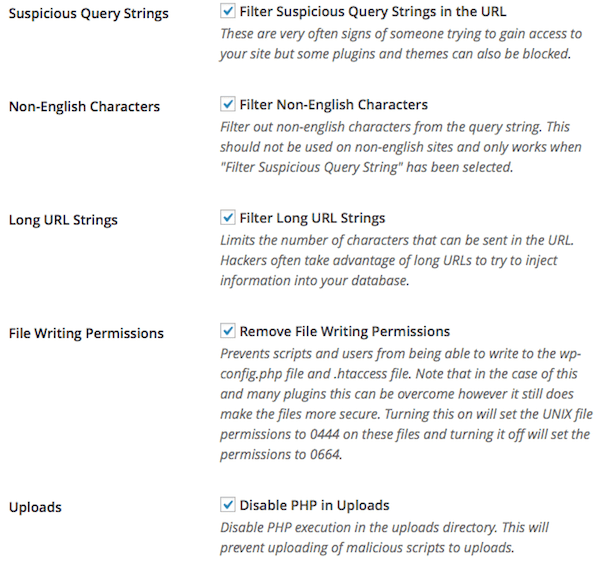
Your WordPress site is not blocking suspicious looking information in the URL. Click here to block users from trying to execute code that they should not be able to execute.
One type of attack is to try to use information in the URL to hack your site. Filter suspicious query strings can help prevent that. I use the next four options as well.
Caution: Some plugins can stop working with these settings. I’ve had specific issues with plugins that perform detailed searches where the url may end in = (for example plugins that search real estate databases)
Your WordPress installation is allowing users without a user agent to post comments. Fix this to reduce comment spam.
When you browse the web your user agent is the browser & OS that you are using. Websites can query this and use it to decide which information you see (such as a downloads page may find out what OS you are using and fill in the correct download for you).
Blocking anyone without a user agent blocks some comment spam bots.

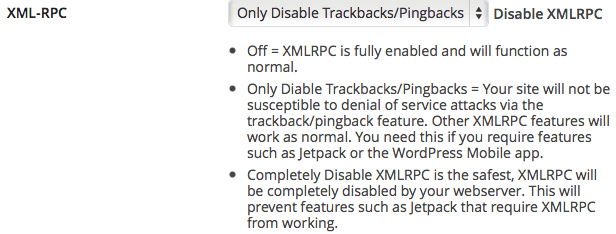
XML-RPC is available on your WordPress installation. Attackers can use this feature to attack your site. Click here to disable access to XML-RPC.
XML-RPC is used by some plugins (like the very popular Jetpack) and used to perform trackbacks/pingbacks. You should disable trackbacks (almost no one displays them and they are usually just annoying). Only complete disable if none of your plugins use XML-RPC.
Note: If you select to just disable trackbacks and ping backs you will see a new warning in the low priority area for XML-RPC (the warning will read: XML-RPC is protecting you from the trackback and pingback attack but is still available on your site).
Users can execute PHP from the uploads folder.
The execution of PHP scripts in your uploads folder can allow hackers to gain access to your site, so blocking that is helpful. I blocked that when selecting options for suspicious URLs above.
Low Priority
Low priority items are low relative to the other items. But they can still cause security issues, so you should consider tightening them up.
You are not blocking any users that are known to be a problem. Consider turning on the Ban Users feature.
Ban users allow you to prevent access to your site from known problem folks. Most people do not have a list of known problem people, so you can use the default blacklist from HackRepair.com.
You may want to consider whitelisting (always allowing) your own IP address. Most ISPs give you a dynamic IP address, but the address always falls in the same range. If this is true you can whitelist a range. If you have no idea what I’m talking about, skip this feature.
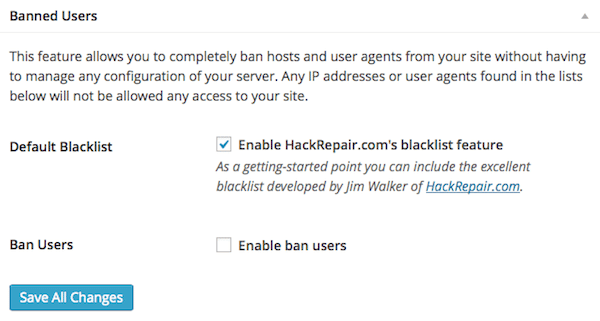
You are not requiring a secure connection for logins or for the admin area.
This is for a secure SSL connection to admin area. Which sounds great, but most websites don’t have an SSL certificate. If you don’t have SSL support you will see this warning.

If you see this warning STOP and do NOT try to activate SSL.
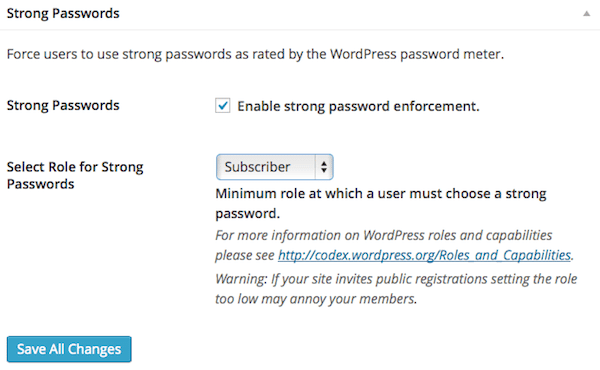
You are enforcing strong passwords, but not for all users.
You’ve probably heard at least 100 times that strong passwords are important. Well, they are still important. Here you can force people to use strong passwords.
I’ve got an article on creating strong passwords you can actually remember here.
You have not disabled directory browsing on your site. Click here to prevent a user from seeing every file present in your WordPress site.
Disabling directory browsing helps to prevent hackers from seeing the list of all of your files.

You are not blocking HTTP request methods you do not need. Click here to block extra HTTP request methods that WordPress should not normally need.
Your WordPress website normally only needs a few types of HTTP requests to be allowed. This blocks the rest.

Your WordPress site is not blocking non-english characters in the URL.
I disabled this in the medium priority section with suspicious URLs. If you are using english, go ahead and block non-english characters. If you are using another language you may not want to block them.
Your installation accepts long (over 255 character) URLS. This can lead to vulnerabilities.
I disabled this in the medium priority section with suspicious URLs.
Your wp-config.php and .htaccess files are writeable. This can lead to vulnerabilities.
I disabled this in the medium priority section with suspicious URLs. Some plugins may need access to wp-config.php or your .htaccess files. Frequently they only need one-time access when they are activated, in that case you can deactivate this feature, activate your other plugin, and then come back and reactivate this feature.
Your WordPress installation is publishing the Really Simple Discovery (RSD) header.
The RSD header is used by only a handful of services (like Flickr), so if you aren’t using any then just lock this up.

Users may still be able to get version information from various plugins and themes.
This causes random version information to be displayed when WordPress has to show a version. The goal here is to prevent those with bad intentions from actually knowing what you are running.

Users can edit plugin and themes files directly from within the WordPress Dashboard.
If you know what you are doing with HTML & CSS and periodically tweak your theme files then leave this alone. If you don’t know what you are doing (and therefore don’t edit those files) then disable the file editor. If the file editor is disabled you will have to download, edit and upload any HTML/CSS files to change them.

Your version of jQuery has not been determined. Load your homepage while logged in to determine the version of jQuery you are using.
If you haven’t checked your homepage while logged in you see a red notice asking you to visit your homepage. This will allow the plugin to get your current version.
If your jQuery is up to date then a green message with your current jQuery version will be displayed. Otherwise you will have instructions for updating.
You should rename the wp-content directory of your site.

If you’ve got all of your other settings working, you should take another complete backup of your site before you change the name of wp-content. This one can break a number of things and you’ll need to check your site afterwards for any missing media files. There’s a reason it has a big red strongly worded warning on it.
Conclusion
Now that you’ve gone through all the checks in the checklist you should see no more than one high priority, only a couple of medium and maybe a handful of low.
Whenever using a new security plugin on an existing site, there can be some issues. If you have anything larger than a couple of pages I would recommend that you copy your site and try out all the features you want to use there.
That said, I am really enjoying the remodel that Better WP Security got when it moved to iThemes Security. The user interface and clean check-list style are fantastic updates. There are still plenty of backend goods to make advanced users happy, and of course it’s still a very solid security plugin for WordPress. I have started using iThemes Security for new sites and am carefully migrating some established sites over to it.

thanks you for this very useful plugin how can help us to reinforce security
Hi, thanks a lot. I had some problems with the plugin but now, it seems to work
Greetings from Germany
Ulrich Eckardt
Ulrich,
Glad to hear that things are going smoothly now. Good luck with your site!
Hi, Gen! Thanks for this post! Bookmarked…done! It’s a very good guide for beginners like me, you just gave a broader explaination! But I have done clumsy things with my site before I found your site just now, I dont know how to make my themes and plugins show up again, my blog becomes a blank white page after changing the wp-content.. Do you have any idea how to direct wordpress to my newly created wp-content name? Thanks in advance 🙂
Hi Jhem,
I recommend that you reload your backup of your site to undo the wp-content directory change. If you don’t have a backup, then you may need to mod some PHP files to undo it (you may also have to do database manipulation). http://codex.wordpress.org/Editing_wp-config.php#Moving_wp-content_folder
Hi Gen! It’s already fixed, thanks to your help 🙂
Thank you so much! God bless x